
In part one of our Remote Discovery - A Guide To Success series, I discussed some of the best ways to prepare for success. In part two, we’ll discuss best practice for running remote discovery workshops, looking at how we work with our clients, the process we follow and some of the tools we use.
Part 2 - Running Remote Discovery Sessions On The Day
Session 1 - 3 Hours
1. Introduce everyone
It sounds obvious, but take the time to do individual introductions. In the absence of being able to form connections with people in a room, people will want to feel comfortable remotely. It’s a good idea to include some quick virtual ice-breakers to get the group warmed up.
Some ideas include:
Quick questions (eg. the first thing I would do if I won a million dollars)
“Choose your favourite”
Trivia questions
Or you can simply ask everyone to post “what does success look like” for them in the session
Getting participants to write their own virtual sticky notes, grouping them by theme and getting them to vote on particular answers is also a great way to introduce them to the tech you'll be using throughout the remote discovery session.

2. Do a remote discovery workshop overview
In part one, I recommended sending out an external agenda to the participants in preparation. Our Product Owner (facilitator) should then spend a couple of minutes chatting through this agenda: meeting etiquette, goals and outcomes, scope of that particular session and communicating the team’s roles and responsibilities.
We’ll also make sure that everyone has their cameras on so we can see their faces and mics are muted by default. We understand remote working can be tricky for some with childcare and things going on, so we try and make participants feel at ease about this from the beginning.
Walk through the tech
It’s a good idea to do a quick run through of the tech so everyone is comfortable. We use Miro, an online virtual whiteboard to collaborate, capture and document all of our discovery outputs.
All of our Miro boards are set up in advance. Here’s how we do it:
We separate our whiteboard canvas into separate areas. For example, we will have areas for product vision and goals, personas, user journey mapping and we also set up a “car park” space, where ideas out(of)scope of the session can be noted and re-visited. This is arranged in a logical workflow from left to right on the screen.
We label each section of the whiteboard clearly and provide handy descriptions of the objectives and activity for that task(s). This provides context for participants and enables a smoother workflow.
The workshop facilitator(s) should have overall control of the whiteboard. When we do ask participants to contribute, we clearly explain the process, how to do it and what is expected of them.

Sign post break times
If we are facilitating a 3 hour remote discovery session, we'll aim for one 10-15 minute break every hour. This is really important for maintaining engagement and allowing all participants to decompress, reflect and make a coffee or three..
Time To Get To The Good Stuff...
3. Establish product vision
Whether you are re-building a product or building it from scratch, understanding your client’s vision, target market and what success looks like for them is critical. If the product is being modernised or re-built, we will do a walk through of the existing product as-is. If it’s a new product, ask the client to present a mini-pitch (like you would to investors). This gets everyone aligned and on the same page.
Product walk through
This can be done via screen sharing capabilities on the video call. Our team will ask the client to walk the team through how they interact with the product and perform tasks. If it’s a mobile app, this can be done via screen-mirroring. Be sure to communicate this expectation to the client ahead of time.
Mini-pitch
If it is a brand new product concept, we’ll ask the client to present their idea and vision to us. They may already have an existing business case, but if not we’ll send them a briefing template to help frame their thinking.
To get started, we will start by asking the participants the following questions:
What defines your product’s success?
What makes your company/ product unique?
Why do/ will customers want to engage with you?
How will you keep users engaged/ returning?
What does your marketplace look like?
Everyone will have probably have different perspectives and answers to these questions and you should make sure everyone has the opportunity to be heard. Enabling “go rounds” means that everyone has a chance to put their thoughts and ideas across without interruption from others. Alternatively, if it’s a bigger group, consider splitting them into smaller groups of two or three.
4. Build user personas
Now it’s time to look at building user personas. A persona is a representation of a type of user/ customer. They help to align strategy and goals to specific user groups. Some businesses might only have one target persona, others may have multiple to consider.
We build our personas collaboratively and use our pre-set up persona Miro board. We limit personas to a maximum of five so we don’t lose focus on core user needs.
To guide the persona creation process, we encourage participants to think about the following;
User bio - gender, age, job, personality traits
What are their goals?
What are their needs/ motivations?
What are the reasons for them to use the product?
Any existing frustrations
Having persona boards set up this way allows the facilitator to more easily stimulate discussion and ideas. From there, we will condense these personas into living PDF documents that will be referred to regularly throughout discovery.
Session 2 (3 Hours)
5. Build the user journey map
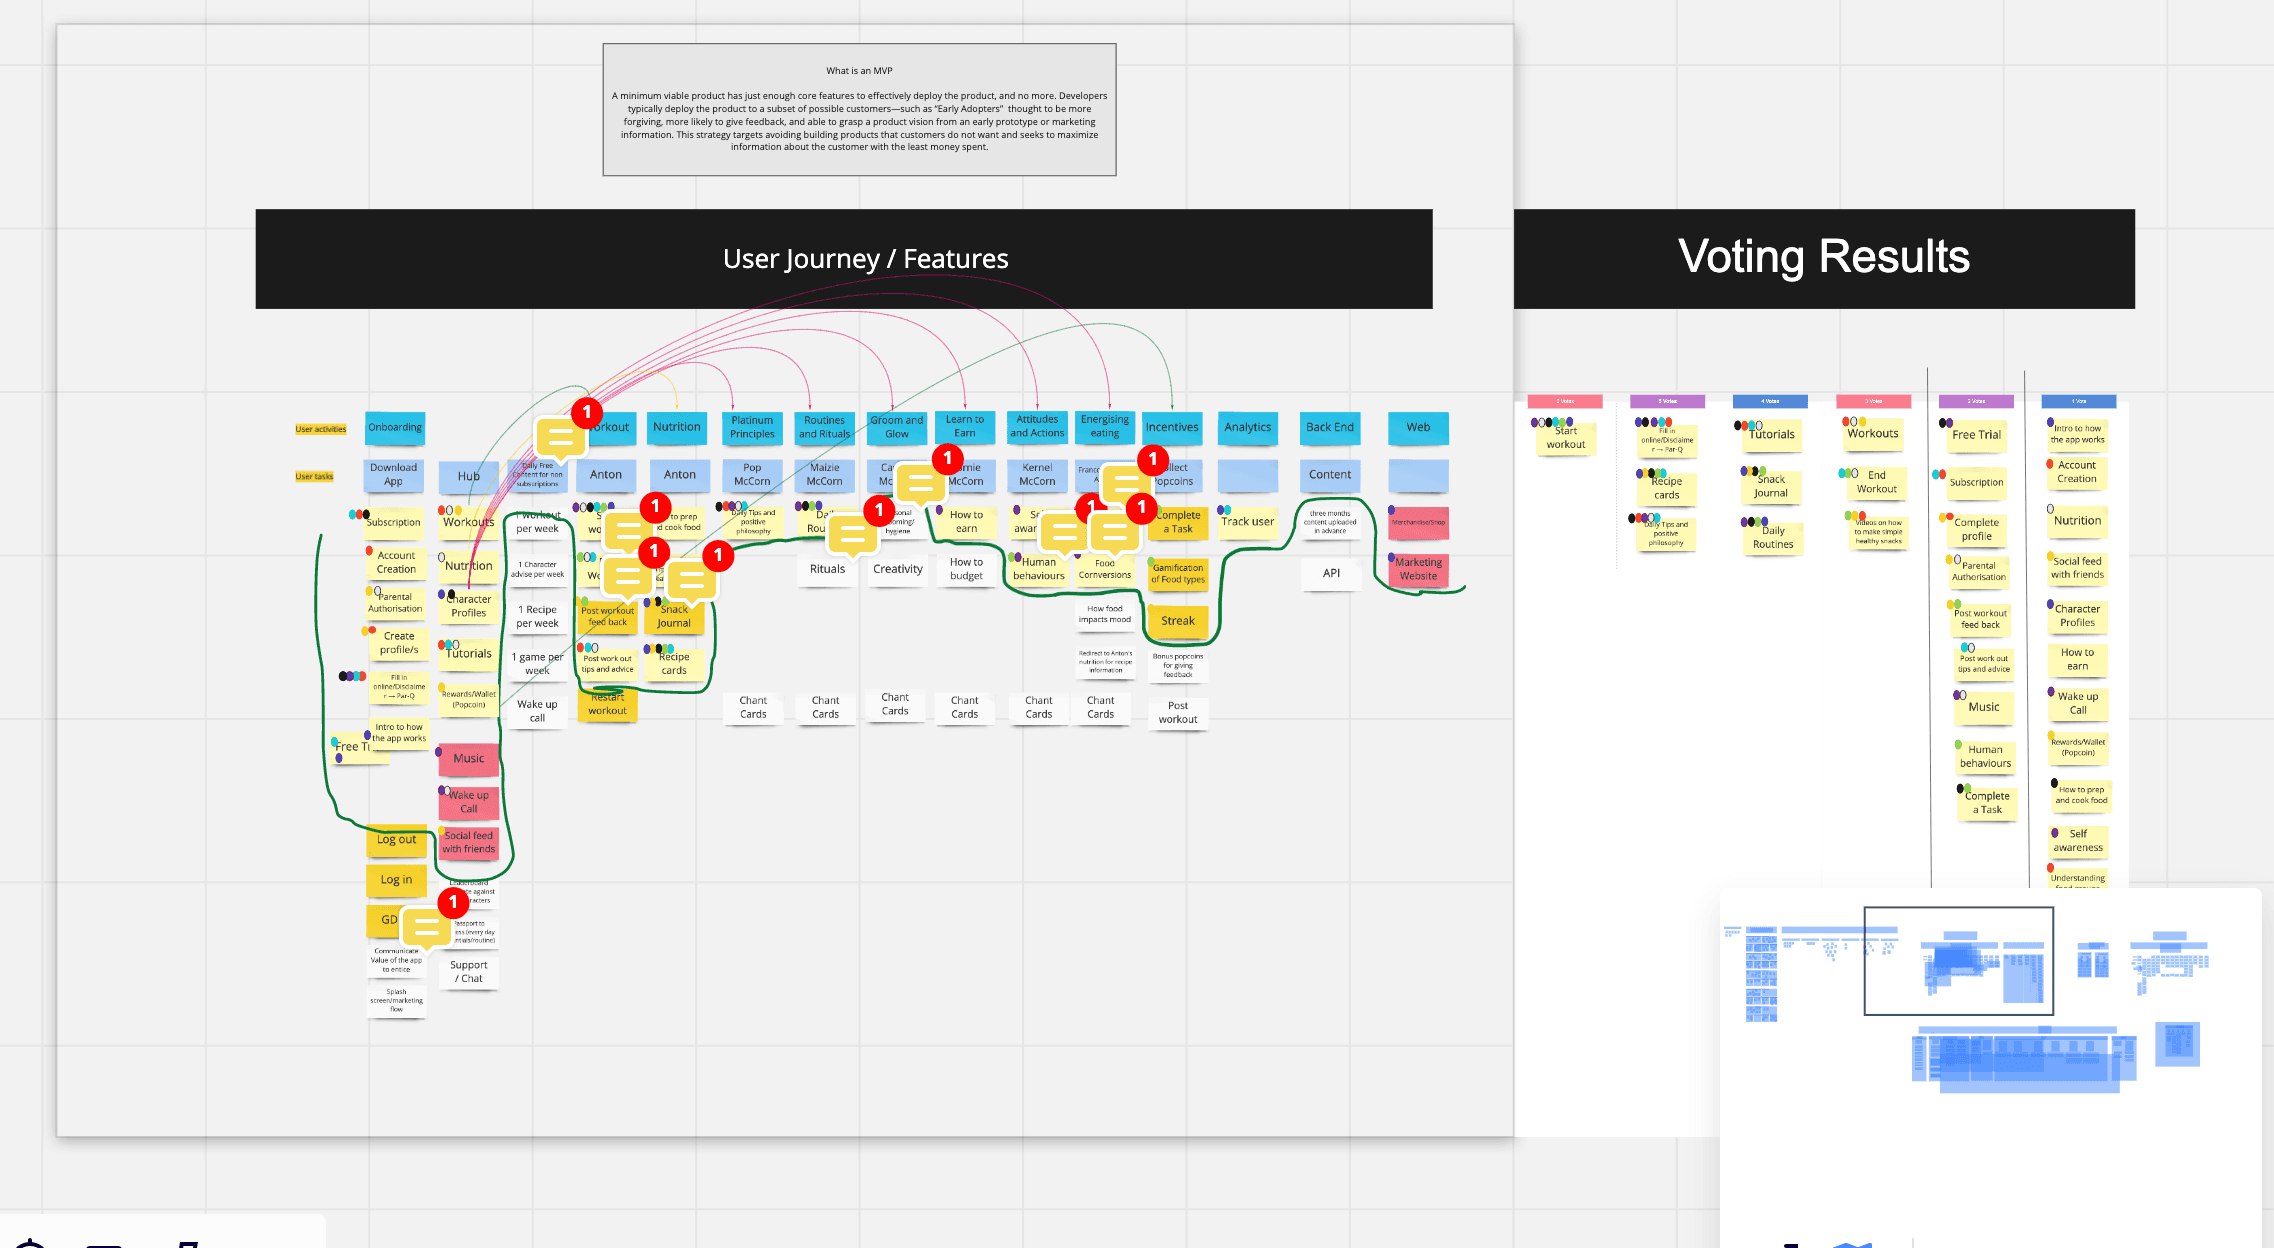
Using the insights that we’ve gained from the product vision, goals, personas and research, the next step is to map out the user journey, a series of steps that looks at how a user might interact with the product.
There’s a number of ways to structure a user journey map. Miro actually has a number of handy pre-built journey mapping templates, but we normally choose to structure our own on a client by client basis.
The journey maps will encapsulate the following:
Collaboratively map out the different phases of the customer journey
Map out the different customer/ user touch points
Detail the user actions within each stage
Establish customer pain points and associate them with a touchpoint
Define any opportunities for improvement
Identify the features required
This process is led by our Product Owner with input from all project stakeholders. Once we have all of the features and the journey mapped out, we will then look to identify the key features that we will need in order to develop a minimum viable product (MVP) - we will cover that in part 3 of the series.
xDesign teams 5 top tips for success:
Encourage participants to take a step back and look at things objectively. This might mean “playing devil's advocate” and challenging existing beliefs and assumptions.
Create a safe space and allow people to hold a conversation without censorship. Honesty is key to building the right product.
Maintain a logical workflow and be strict about timing. Don’t be afraid to use plugin timers to keep you on track. Use the “car park” to capture any ideas and thoughts that are out with the scope of the session.
Make sure that everyone has the opportunity to have their voice heard throughout each part of the discovery session. Giving people their own coloured sticky notes for example can help you see who is contributing and who might be struggling.
Keep the momentum after the session. Follow up promptly with a summary of outputs and organise a team debrief to discuss what went well and what can be improved upon.
Interested in finding out more about our product discovery process? Get in touch for a chat with the team and we’d be delighted to help!
